Microsoft 365 access is granted through application permissions (admin consent). The product has three consent packages:
Demo — trial/evaluation (read scopes plus Mail.Send for reports)
Production — full processing (write, labels, Teams, SharePoint). None of these permissions are optional.
Production + DLP — Production plus Copilot, DLP Teams-app, audit-log, and Exchange transport rules
Approve only the package that matches how you use the platform. These lists are the permissions the product actually requests. Delegated User.Read is not part of any package.
Permission packages
DEMO
Read-only evaluation. Scans mail and files, reads the directory, and sends reports. Cannot delete, label, or change content. Graph only — no SharePoint REST app roles and no Exchange.ManageAsApp.
Microsoft Graph (application)
Directory.Read.All (AD)
Files.Read.All
Mail.Read (Exchange Online)
Mail.Send (Sends Reports)
User.Read.All (AD)
Return URL for all setup:
Production
Full processing. Finds and classifies personal data, then applies approved deletions and labels across Exchange, OneDrive, SharePoint, and Teams. Nothing is deleted without explicit human approval. Every permission below is required — none are optional.
Microsoft Graph (application)
ChannelMessage.Read.All
Chat.Read.All
Contacts.Read (Extract Known Persons)
Directory.Read.All (AD)
Files.ReadWrite.All (OneDrive)
InformationProtectionPolicy.Read.All (MIP Labels)
Mail.ReadWrite (Exchange Online)
Mail.Send (Sends Reports)
MailboxSettings.ReadWrite (Outlook Categories)
Sites.FullControl.All (SharePoint)
Sites.ReadWrite.All (SharePoint)
Team.ReadBasic.All (Teams Source)
User.Read.All (AD)
SharePoint (application)
Sites.FullControl.All
Sites.Read.All
User.Read.All
Production + DLP
Production plus real-time Data Loss Prevention: alert or block sensitive sharing, including Copilot, and enforce Exchange transport rules. Only customers who enable DLP consent to this package.
Includes every Production Microsoft Graph and SharePoint permission above, plus:
Microsoft Graph (additional, application)
AiEnterpriseInteraction.Read.All (Copilot Source)
AppCatalog.Read.All (DLP Bot)
AuditLogsQuery.Read.All (Copilot Audit)
TeamsAppInstallation.ReadWriteForTeam.All (DLP Teams)
TeamsAppInstallation.ReadWriteForUser.All (DLP Teams)
Office 365 Exchange Online (application)
Exchange.ManageAsApp (Exchange Transport Rules)
SharePoint (application, same as Production)
Sites.FullControl.All
Sites.Read.All
User.Read.All
Additional: Exchange Online Archive (EWS)
This is not part of DEMO, Production, or Production + DLP. Add it only if Online Archive is scanned via EWS:
full_access_as_app (Online Archive)
Redirect URL
For Azure AD authentication the platform must be Web.
Redirect URL = the primary server domain + /api/auth/ad/login/authorized
If your server domain is https://gdpr.dataandmore.com, the redirect URL is:
https://gdpr.dataandmore.com/api/auth/ad/login/authorized
Universal return URL for DEMO: https://signup.dataandmore.com/api/authorize_redirect
See also: Redirect URL — Azure AD Authentication
If you register your own app (instead of using a Data & More invitation / admin-consent link):
Send the application id (client id) to support@dataandmore.com
Send the secret value (not the secret id) directly to your contact in Data & More
Invitation / admin-consent links use Data & More’s app registrations — you do not create a client secret in that flow.
Step-by-Step Guide
1. Application Registration
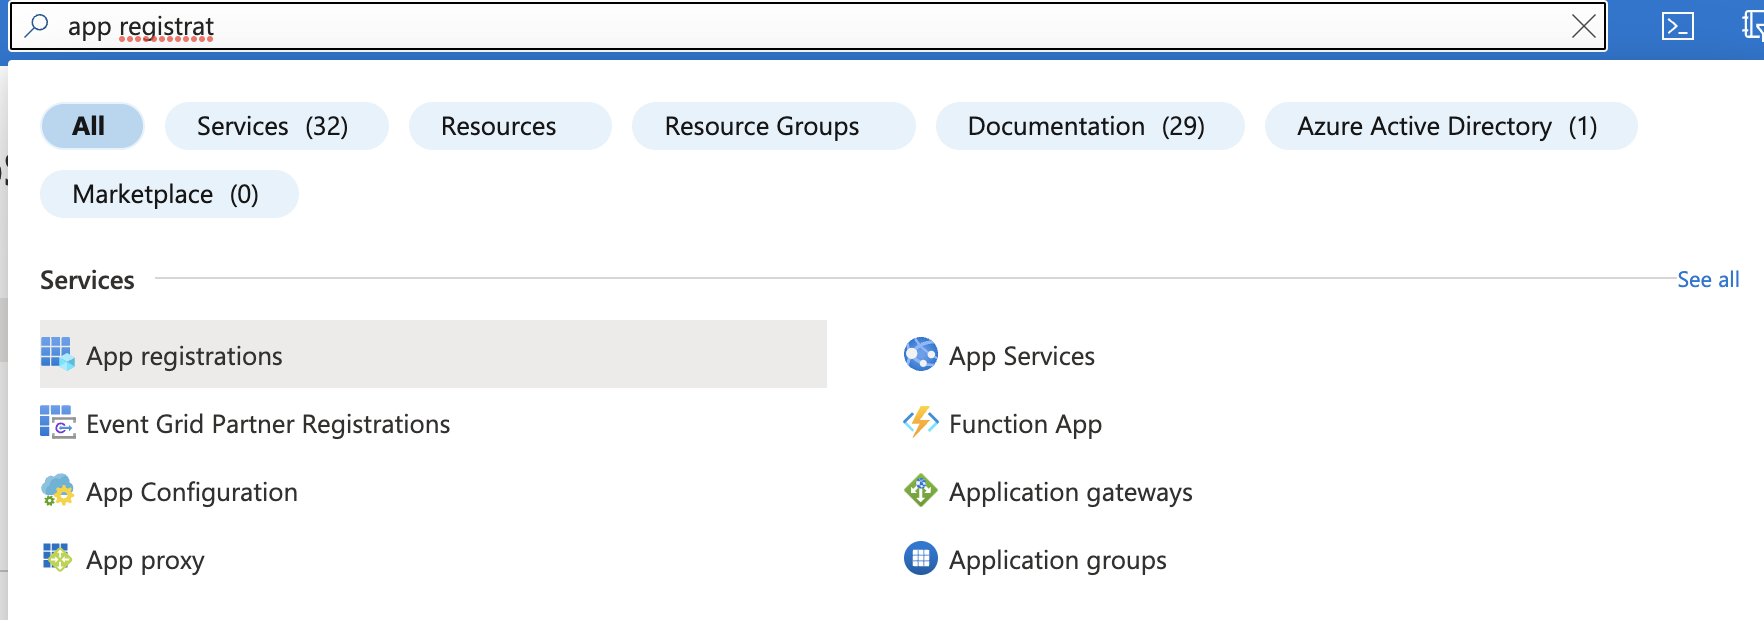
Go to portal.azure.com and log in with the global admin of your 365 domain. Search and select App Registration.
You’ll see a list of all your registered applications and a few options at the top. Select New registration.

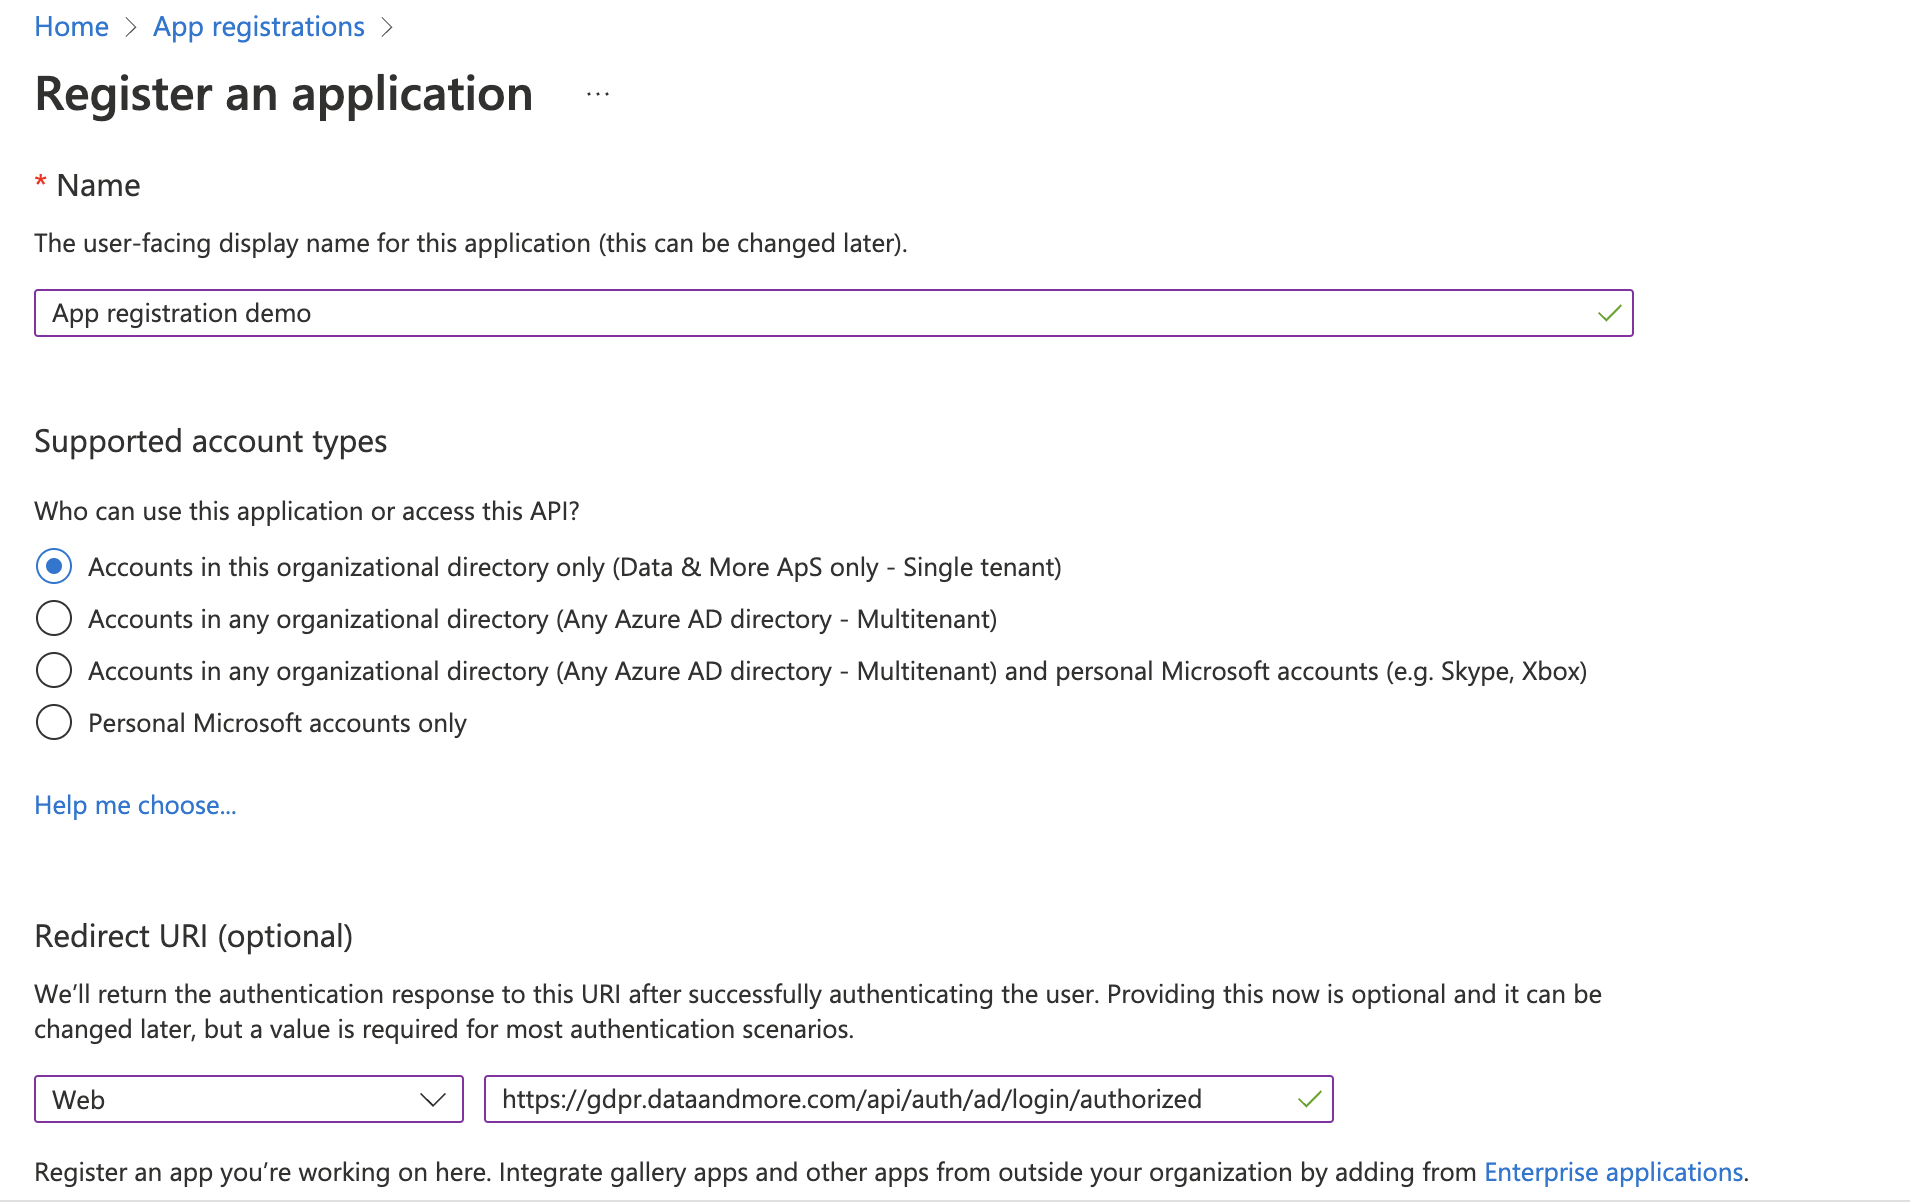
When creating a new app registration, you’ll need to name it, choose who can use it, and enter a redirect URL.
Redirect URL — "the primary server domain" +
/api/auth/ad/login/authorized
So if your server domain is https://gdpr.dataandmore.com the redirect URL should be:
https://gdpr.dataandmore.com/api/auth/ad/login/authorized
Click on the Register button on the bottom left.
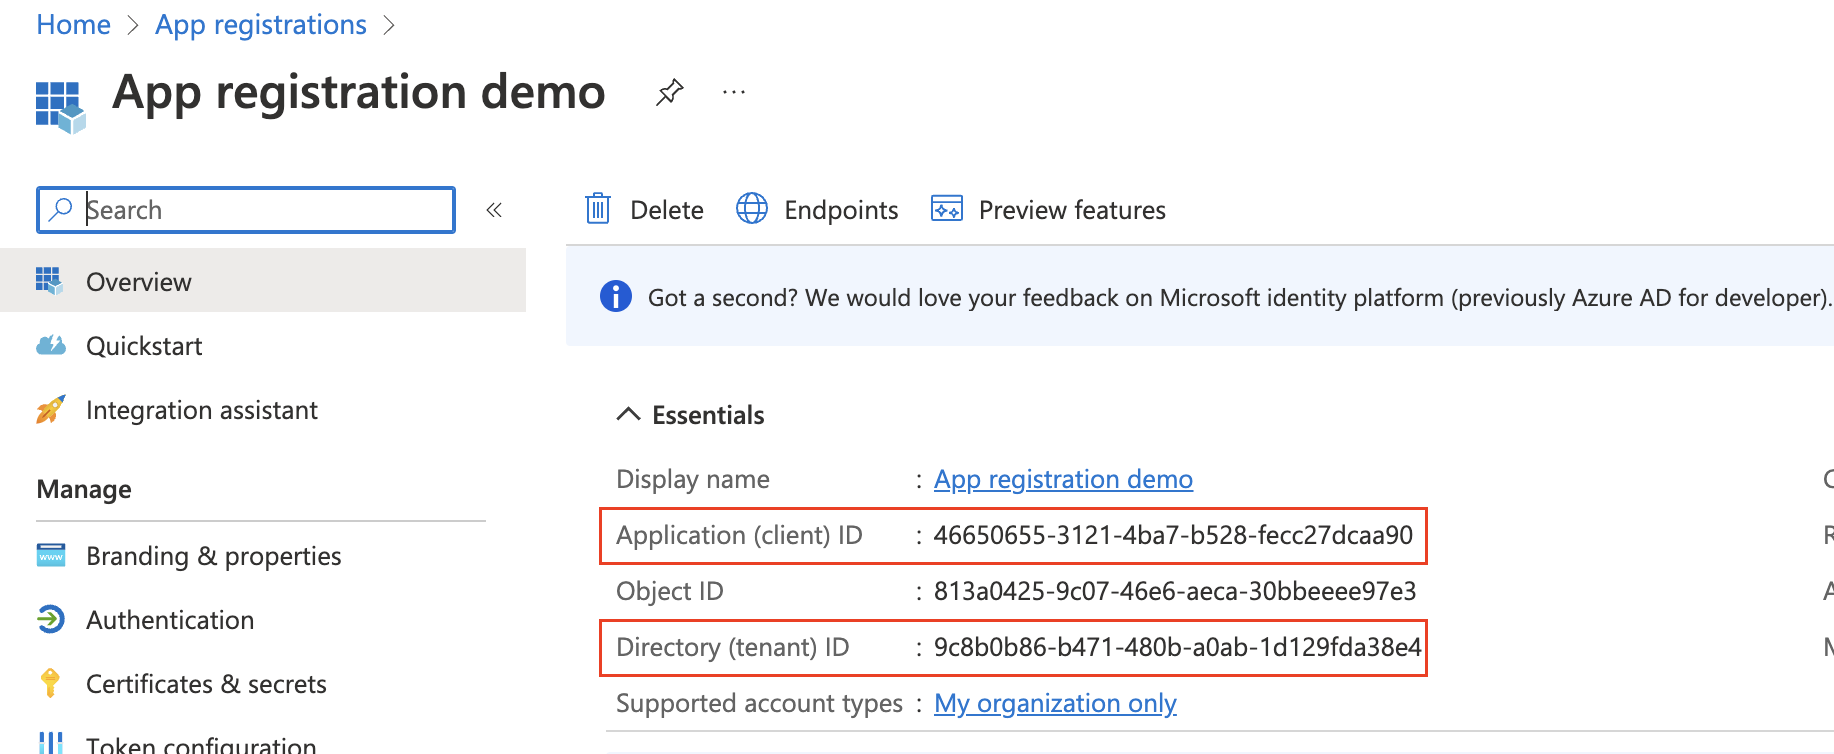
When the app registration is created, you’ll see the Overview page with all the details such as Name, Client ID, Tenant ID, Object ID and so on.
2. API permissions
Go to API permissions on the left side.
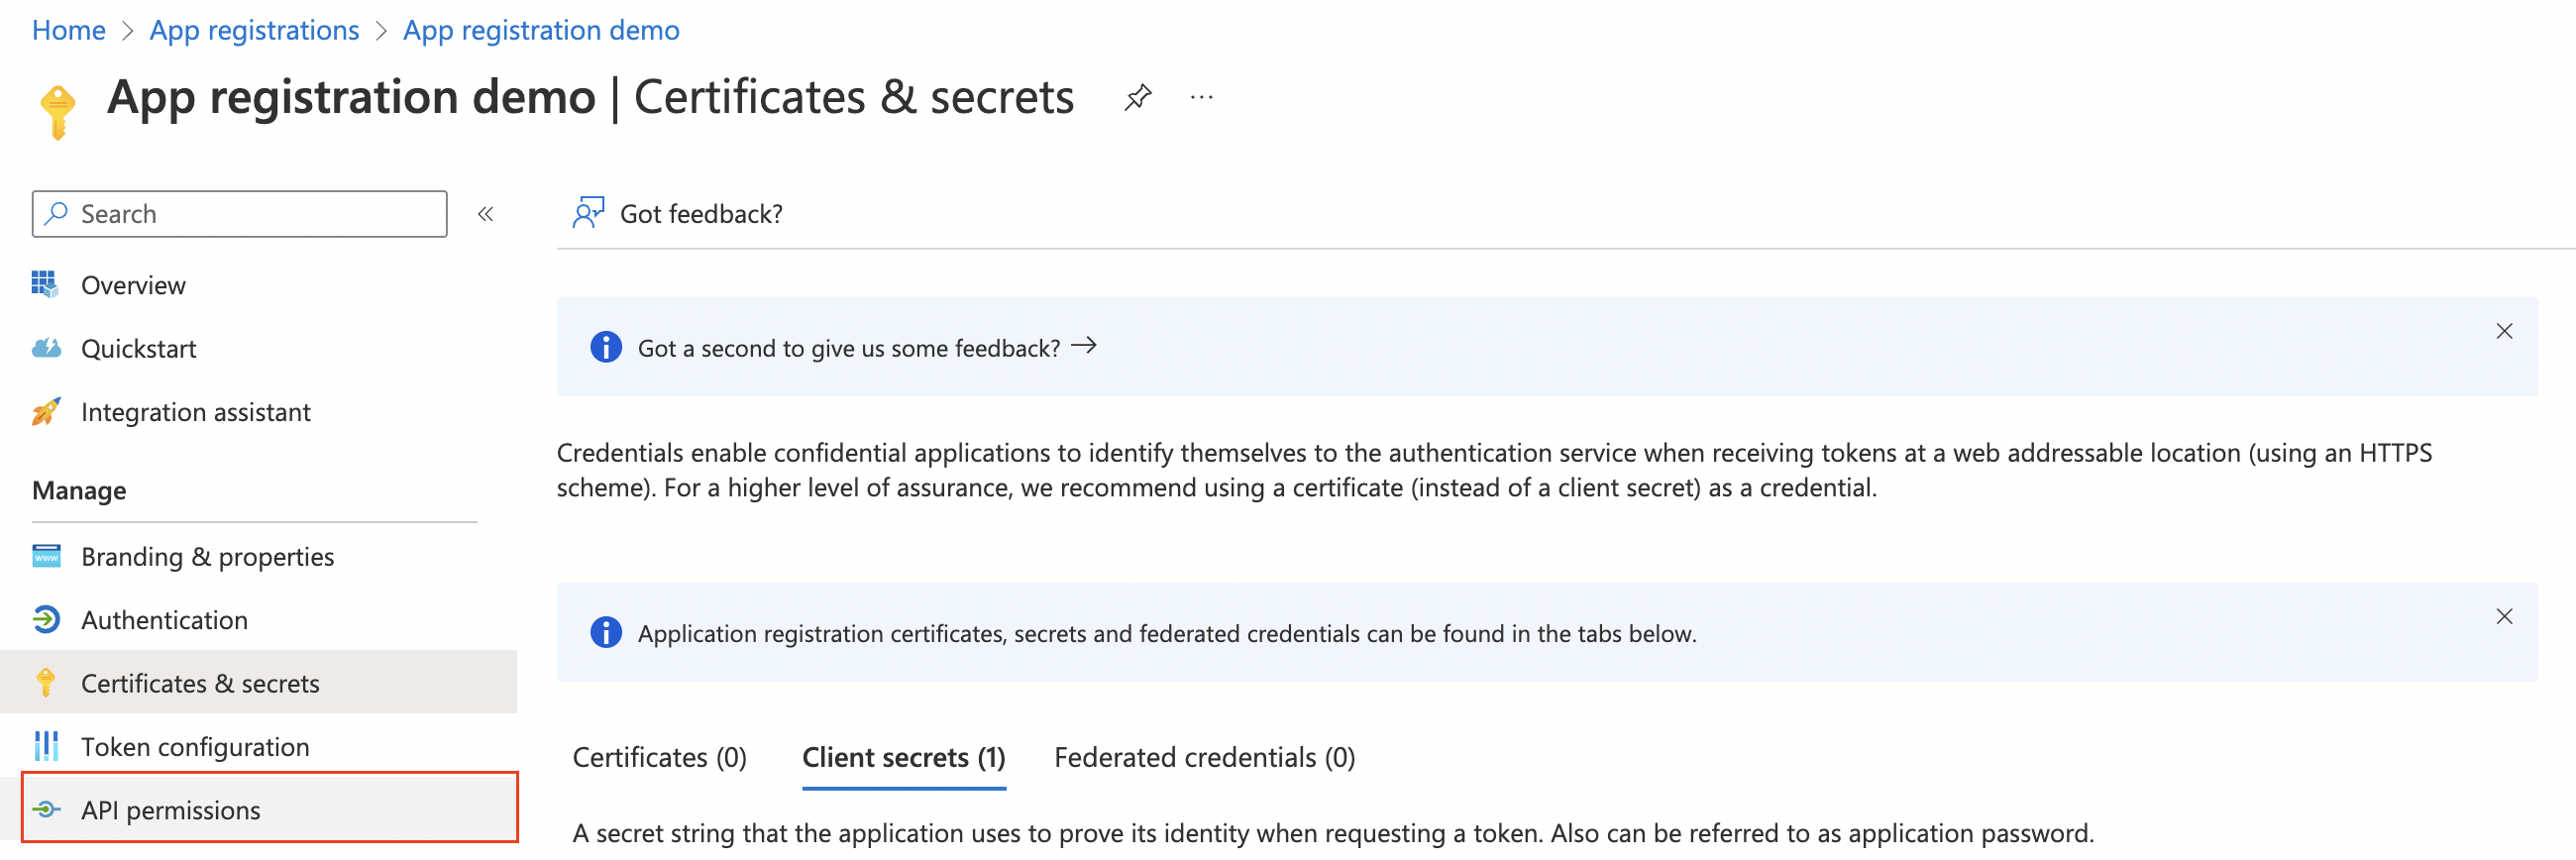
Click on Add a permission.
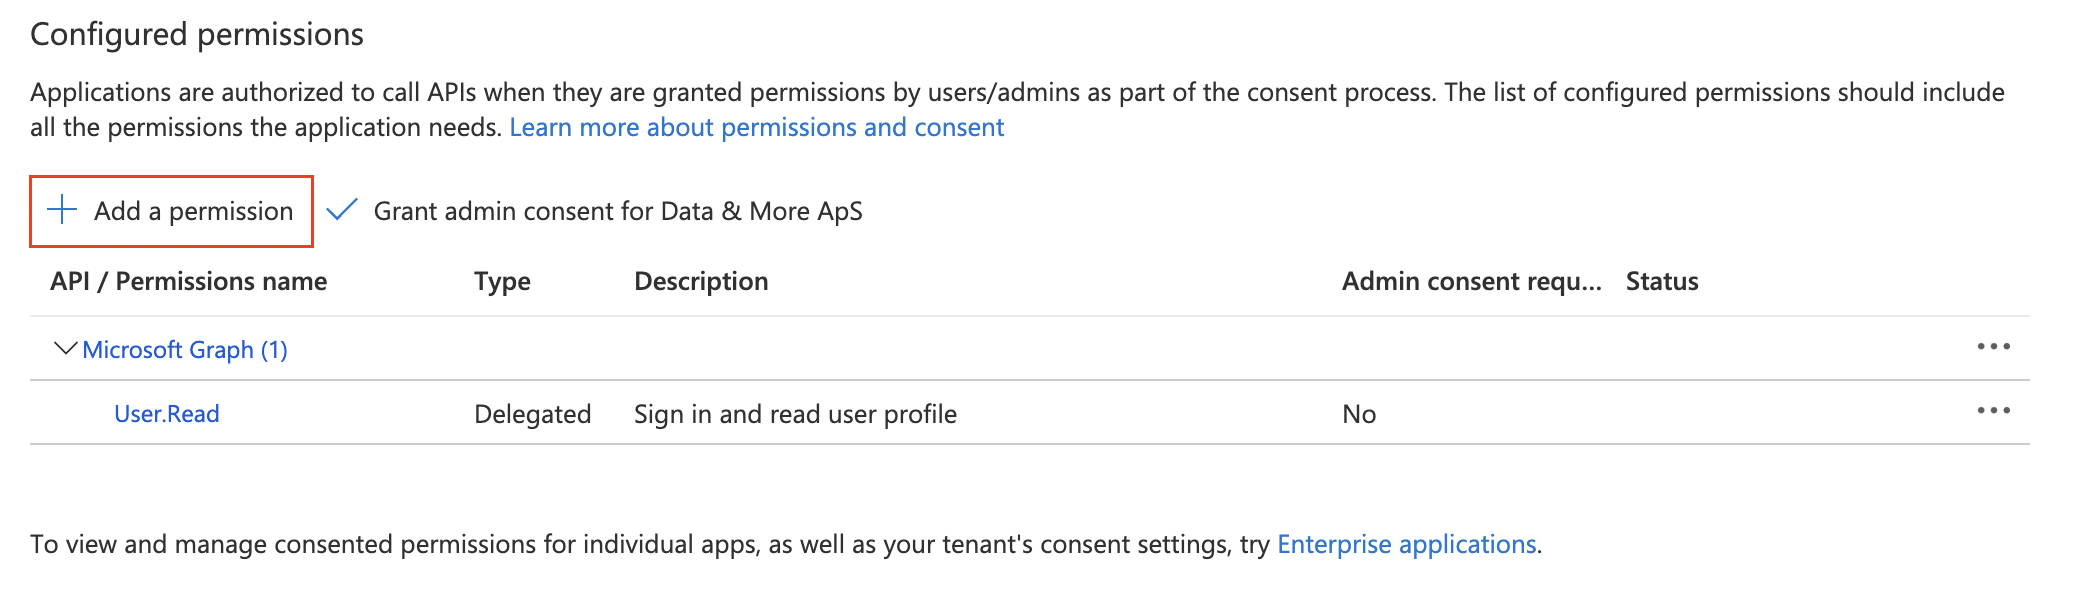
Click on Microsoft Graph and select Application permissions.
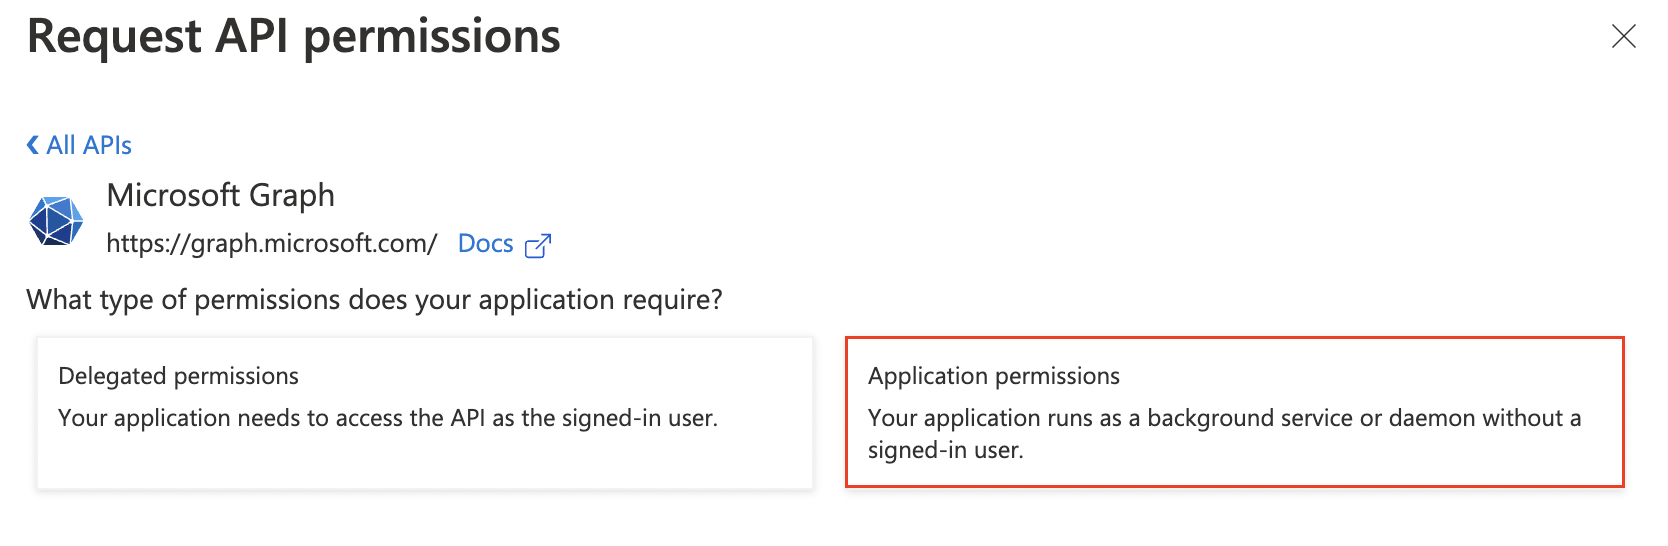
Add the Microsoft Graph application permissions for the package you are setting up (DEMO, Production, or Production + DLP) from the lists above.
For a typical Production Graph set, add:
ChannelMessage.Read.All
Chat.Read.All
Contacts.Read (Extract Known Persons)
Directory.Read.All (AD)
Files.ReadWrite.All (OneDrive)
InformationProtectionPolicy.Read.All (MIP Labels)
Mail.ReadWrite (Exchange Online)
Mail.Send (Sends Reports)
MailboxSettings.ReadWrite (Outlook Categories)
Sites.FullControl.All (SharePoint)
Sites.ReadWrite.All (SharePoint)
Team.ReadBasic.All (Teams Source)
User.Read.All (AD)
For DEMO, use the DEMO Graph list instead (read scopes, including Files.Read.All — not Files.ReadWrite.All).
For Production + DLP, add the Production Graph list and the five additional Graph permissions in the Production + DLP section.
Click on Add permissions.
SharePoint (Production and Production + DLP)
Click Add a permission again, open the APIs my organization uses tab, and search for SharePoint. Add these Application permissions:
Sites.FullControl.All
Sites.Read.All
User.Read.All
Then click Add permissions.
Office 365 Exchange Online (Production + DLP)
Click Add a permission, open APIs my organization uses, and search for Office 365 Exchange Online.
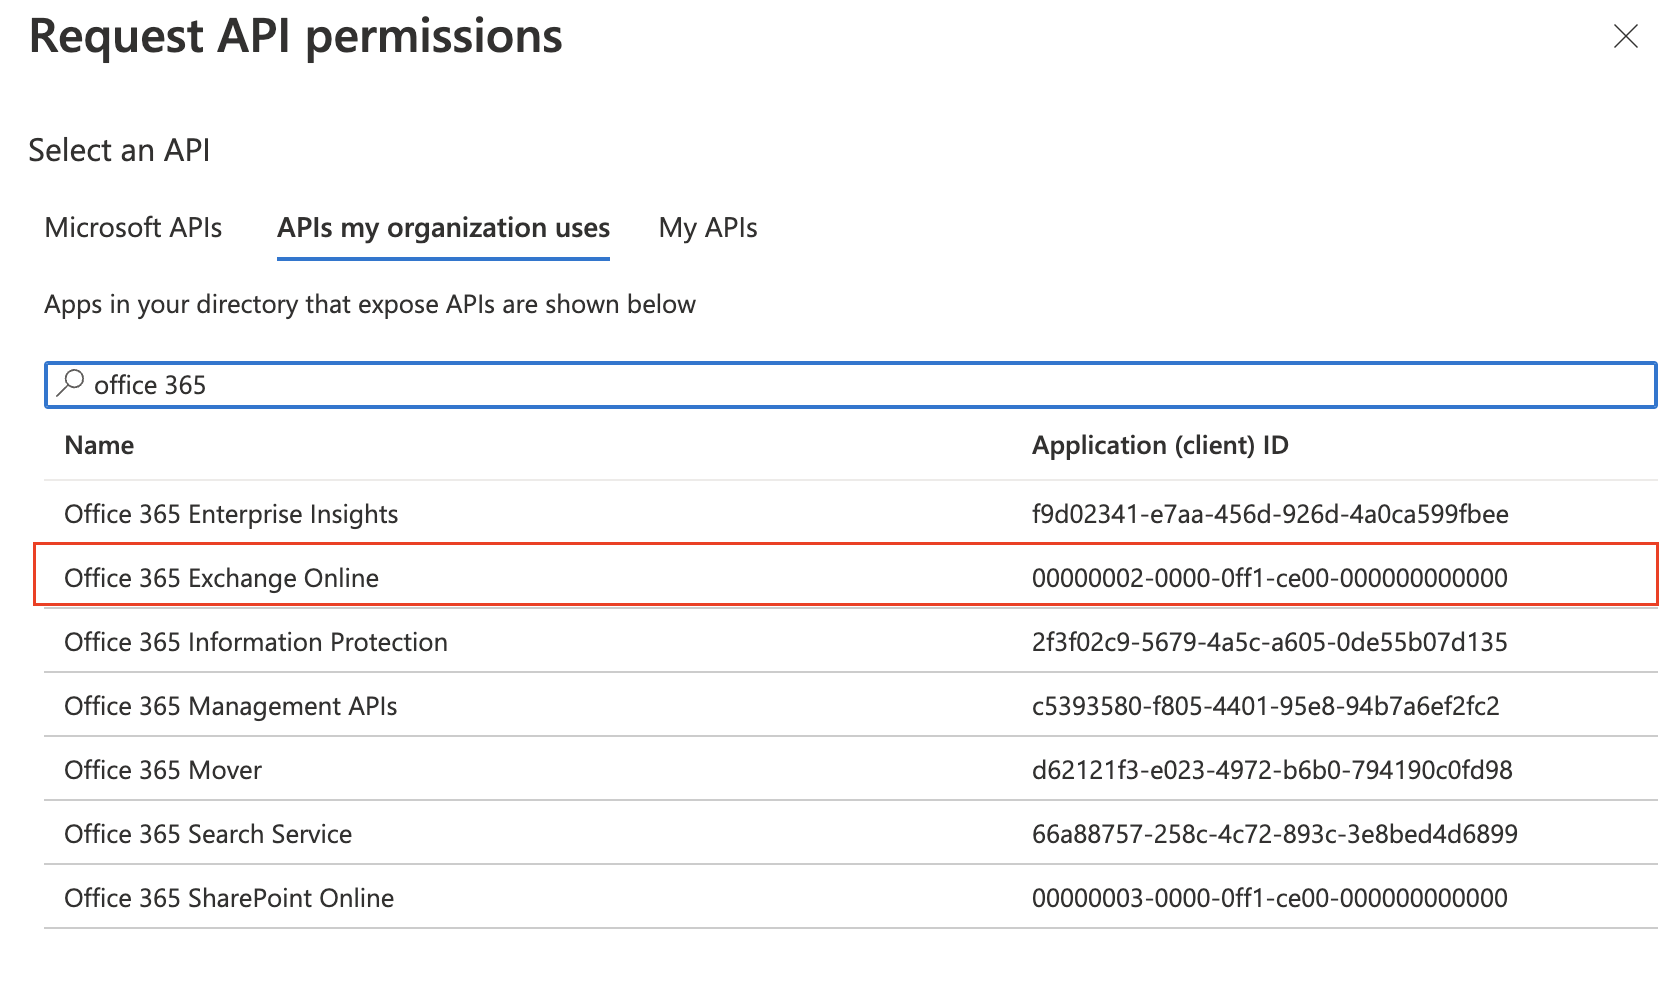
Select Application permissions, add Exchange.ManageAsApp, and click Add permissions.
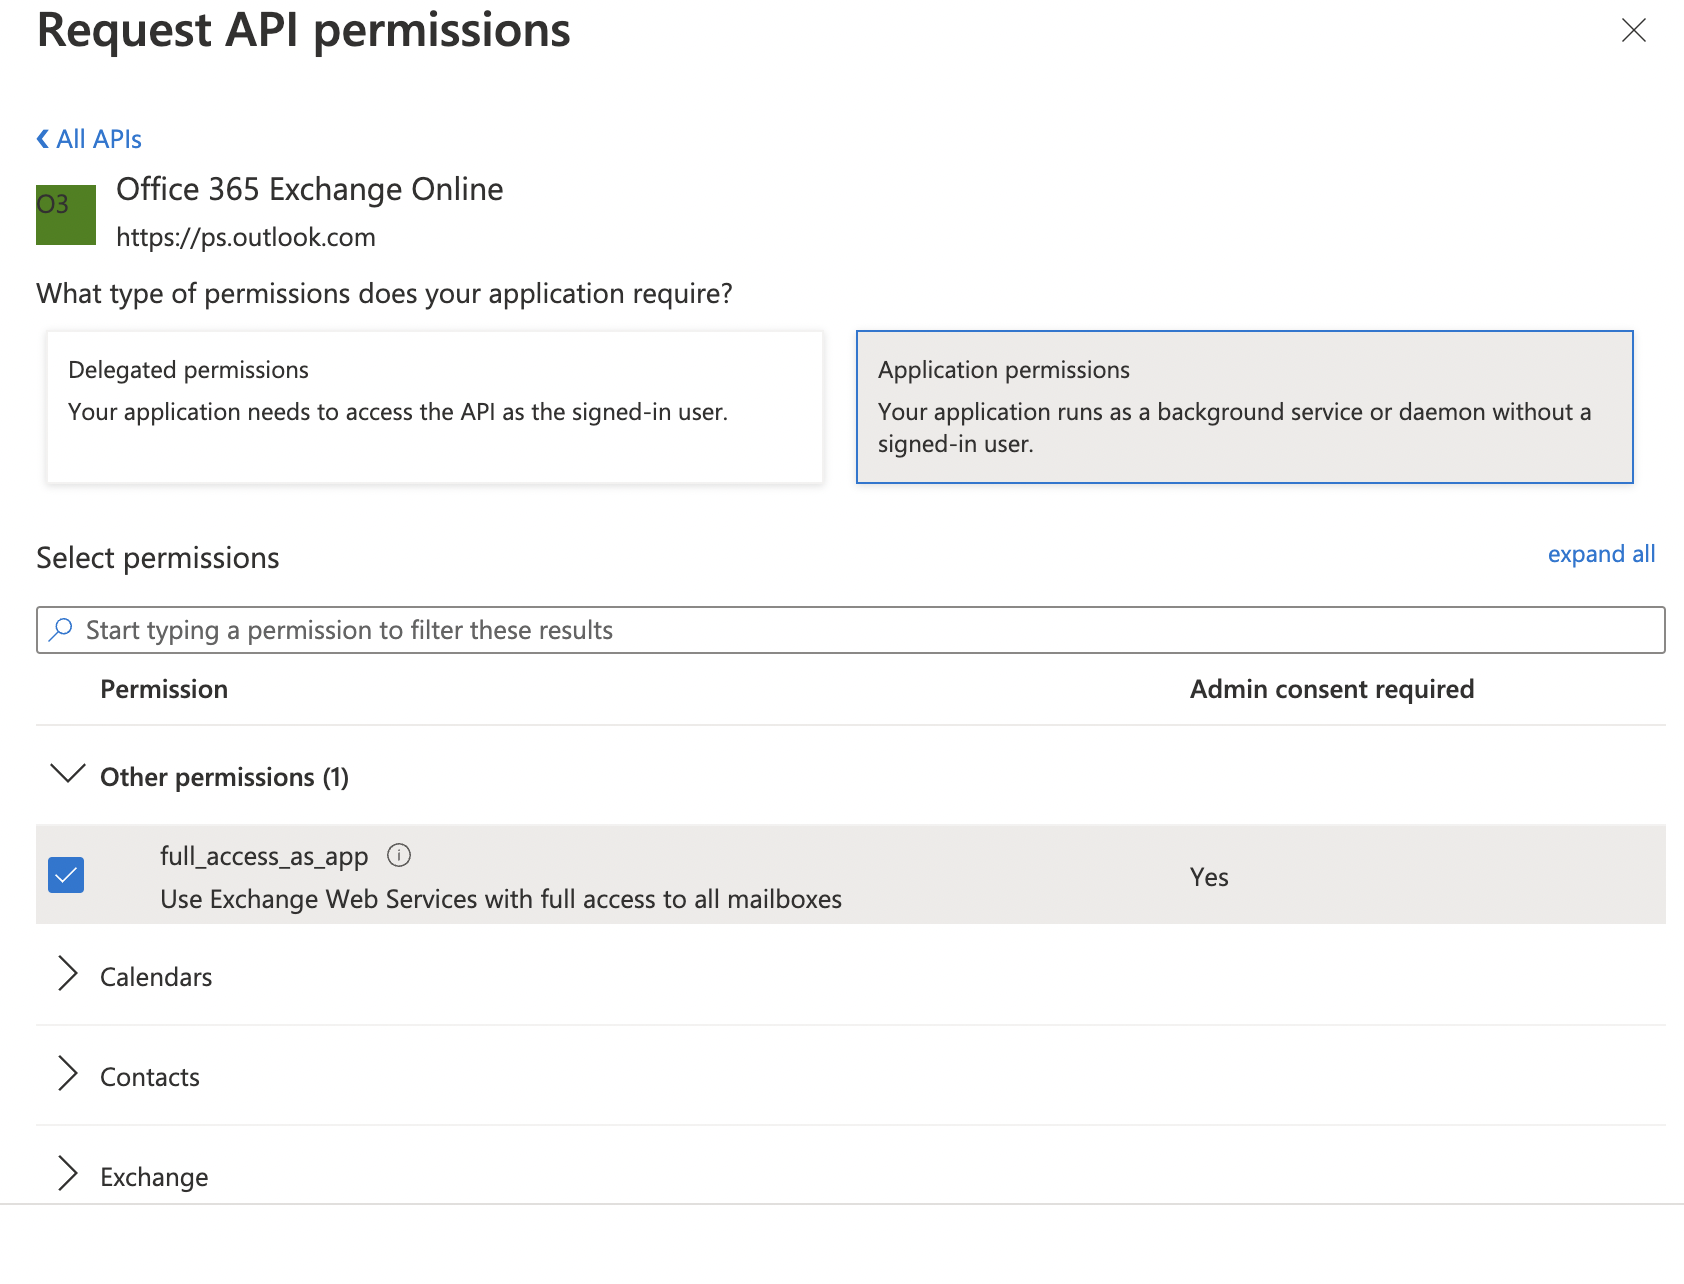
The screenshot shows the Exchange Online application-permission picker. Choose Exchange.ManageAsApp for Production + DLP. Choose full_access_as_app only if you scan Exchange Online Archive via EWS.
Grant admin consent
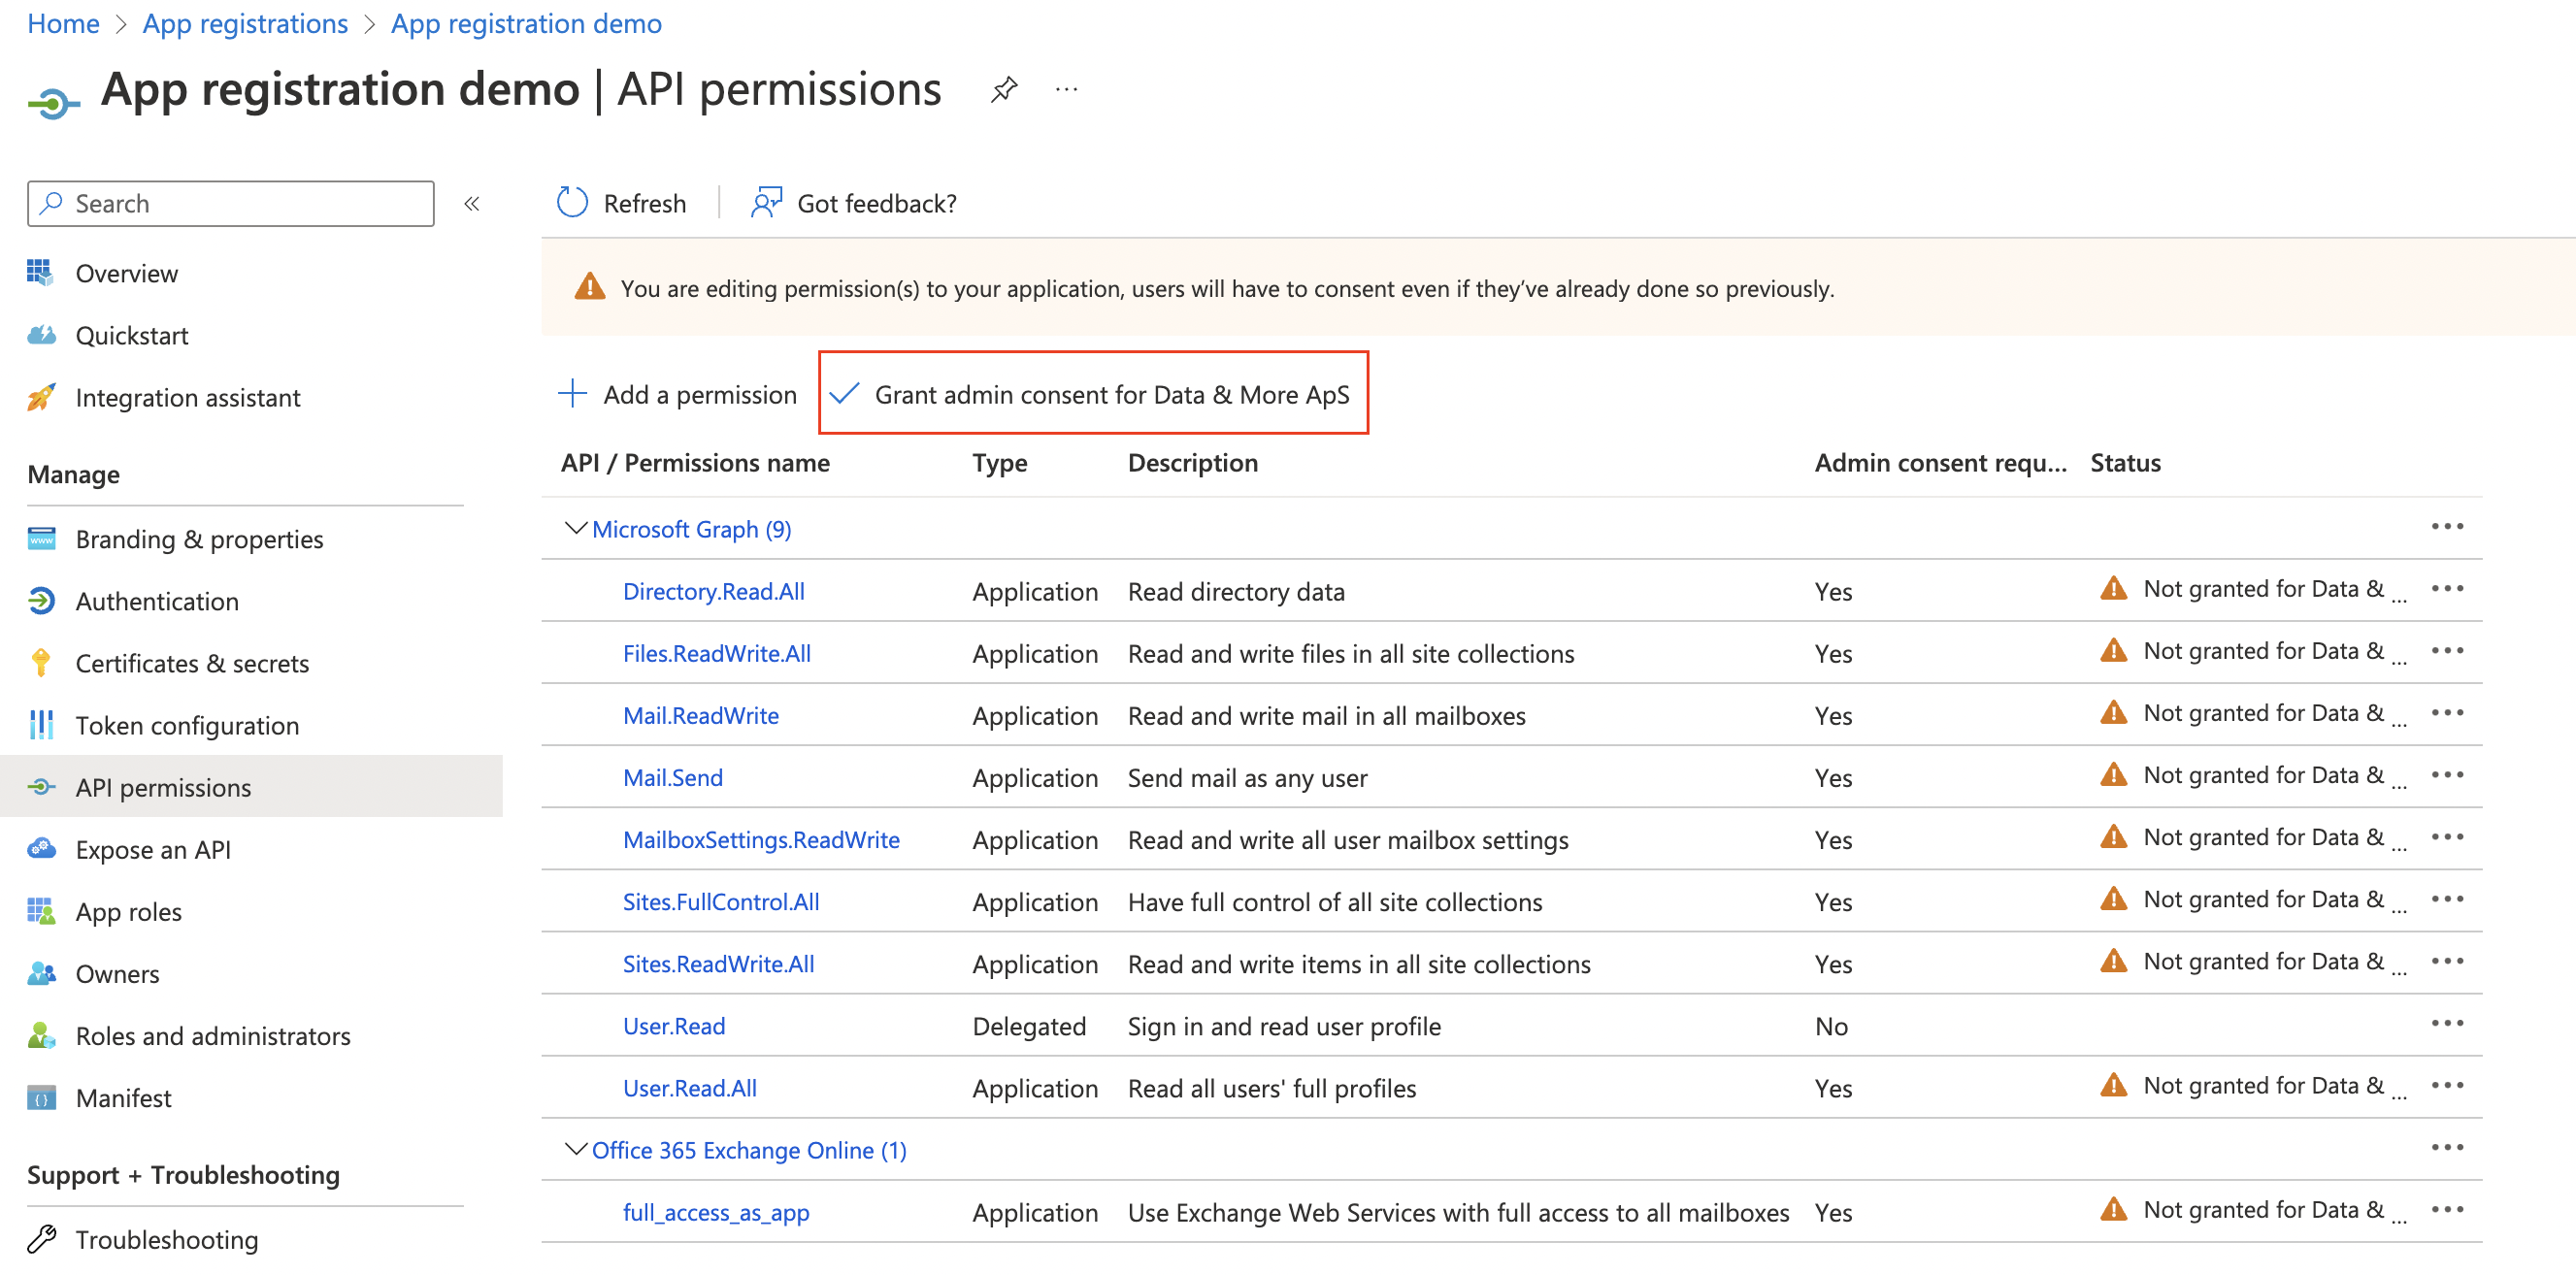
Click Grant admin consent at the top of the table and confirm the action in the pop-up window.
If you successfully did that, your table should list the permissions for the package you chose, all with admin consent granted:
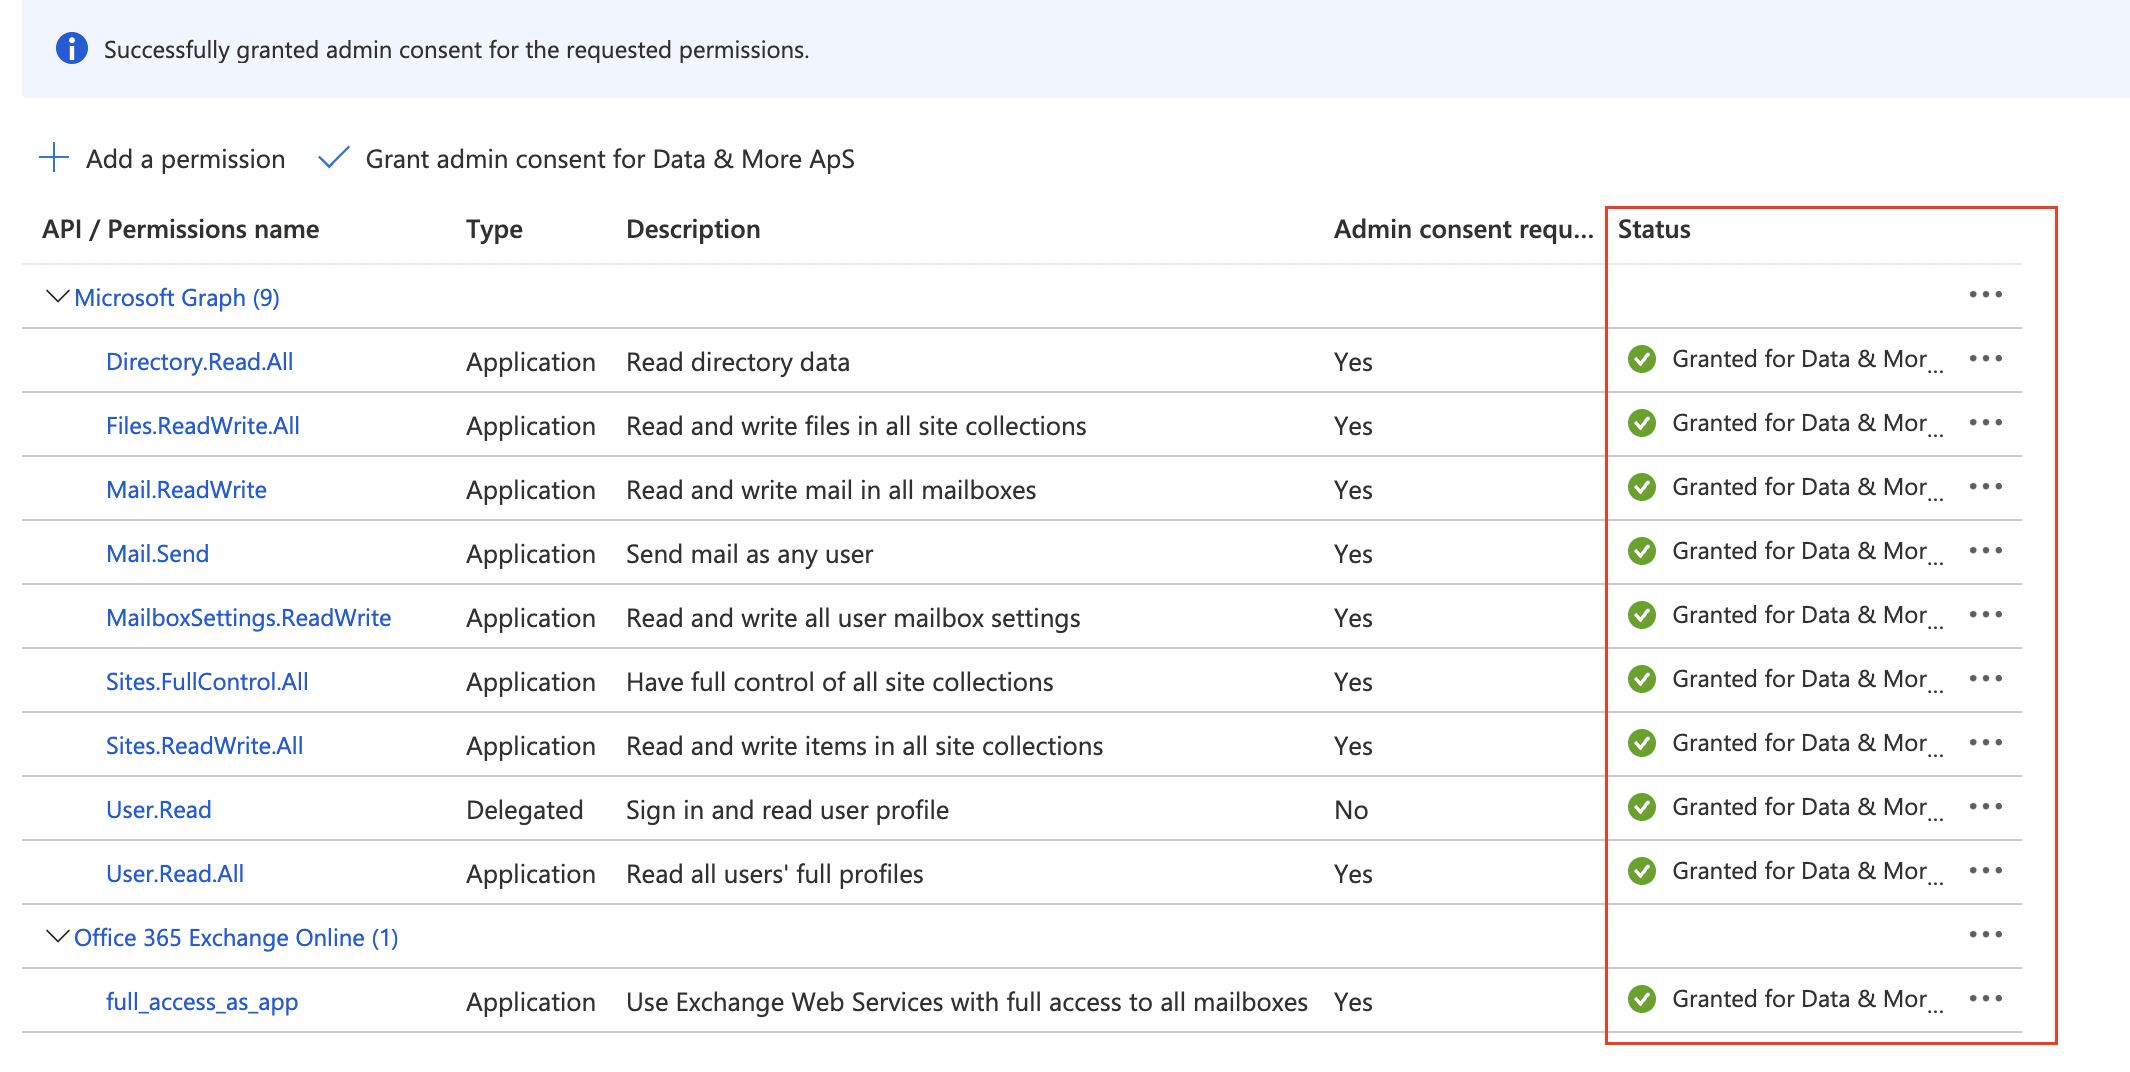
The screenshot is an example of a granted-consent table. Your exact rows depend on DEMO vs Production vs Production + DLP.
3. Keys
If you go to the Overview page of your app registration, you'll see the details such as Name, Client ID, Tenant ID, Object ID and so on.
You need to provide Data & More with: Client ID, Tenant ID and Secret Value.
Client ID and Tenant ID can be found on the Overview page.
To get Secret Value, go to Certificates & secrets on the left side and click on New client secret.
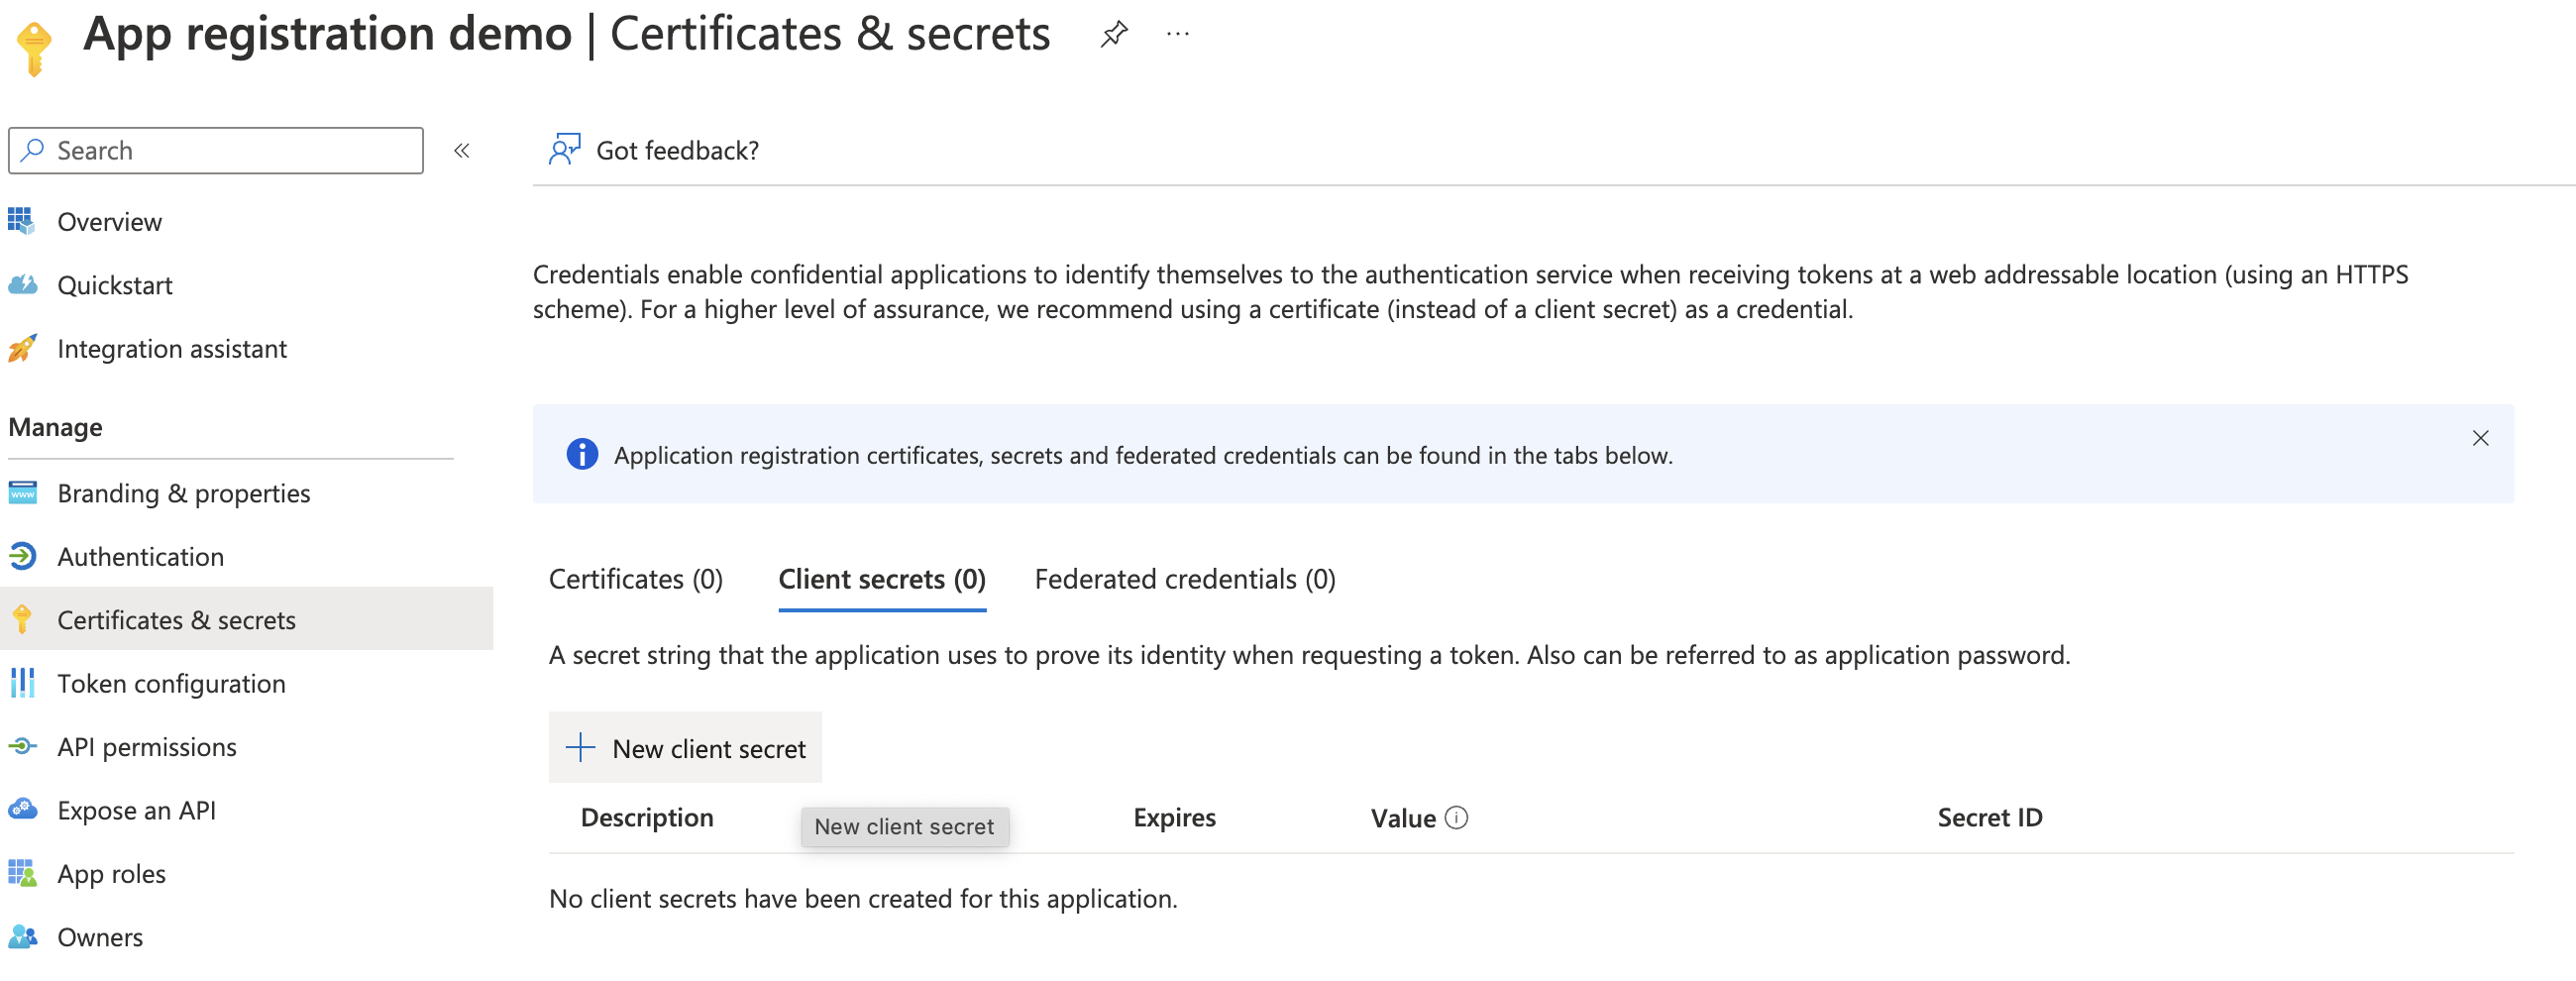
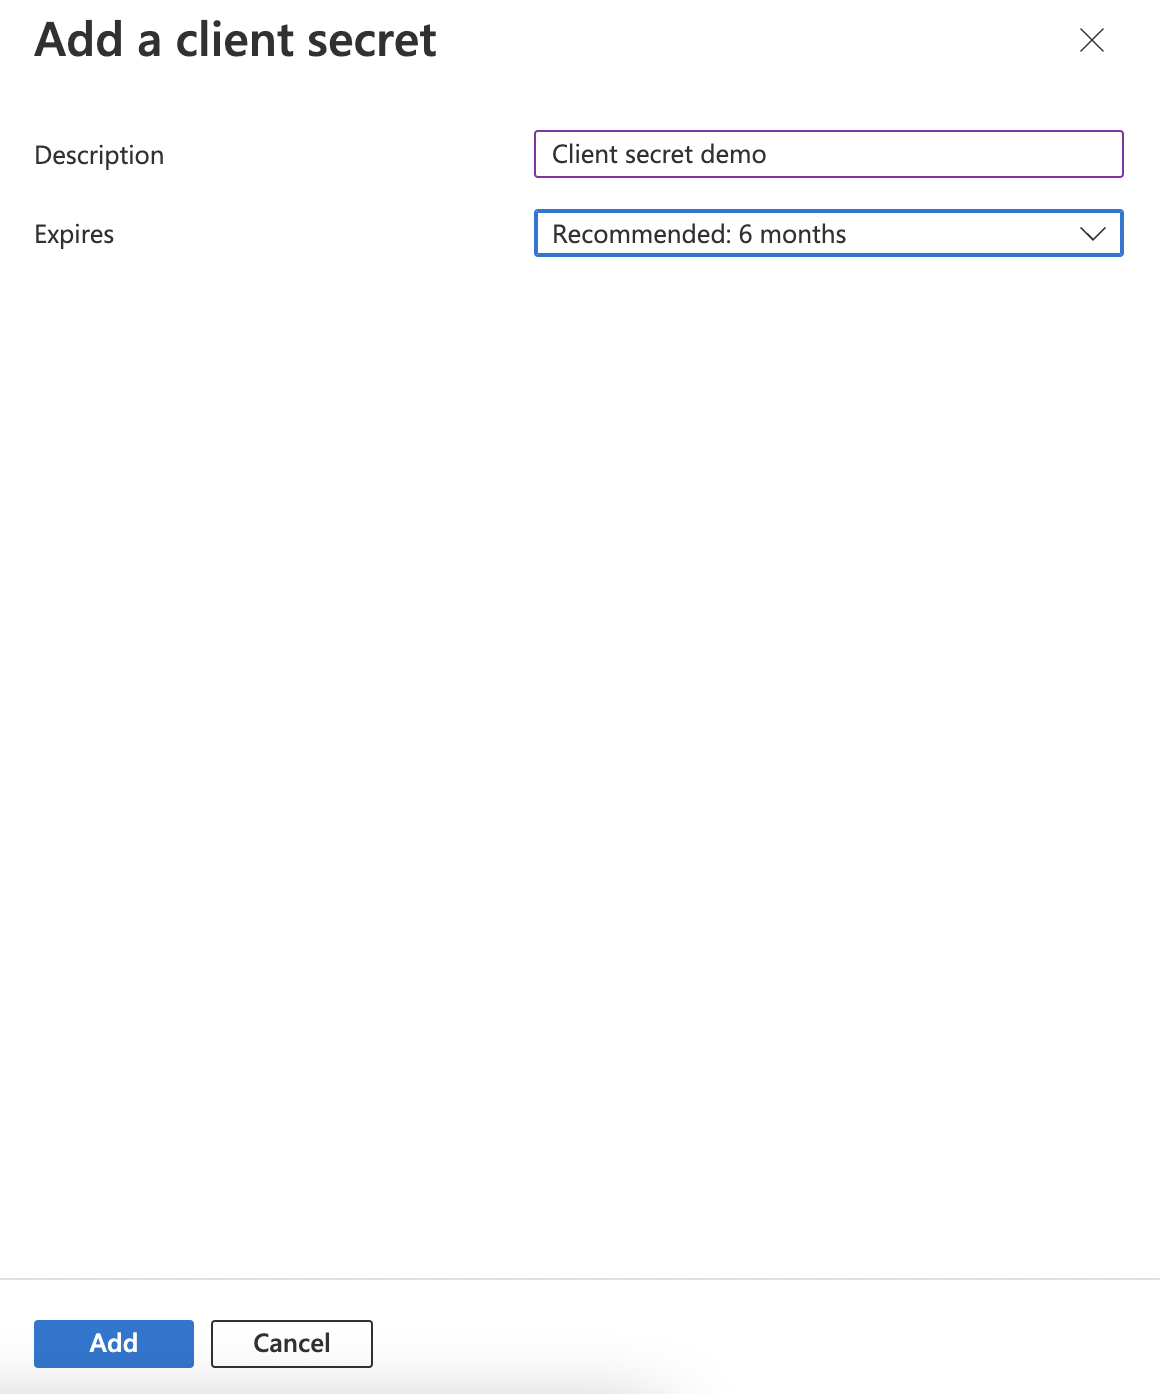
Add a client secret description and when it will expire. After that, click on Add.
When a client secret is created, you should see it on the list with all the details. Secret value can be found here — copy it while you are on this page.
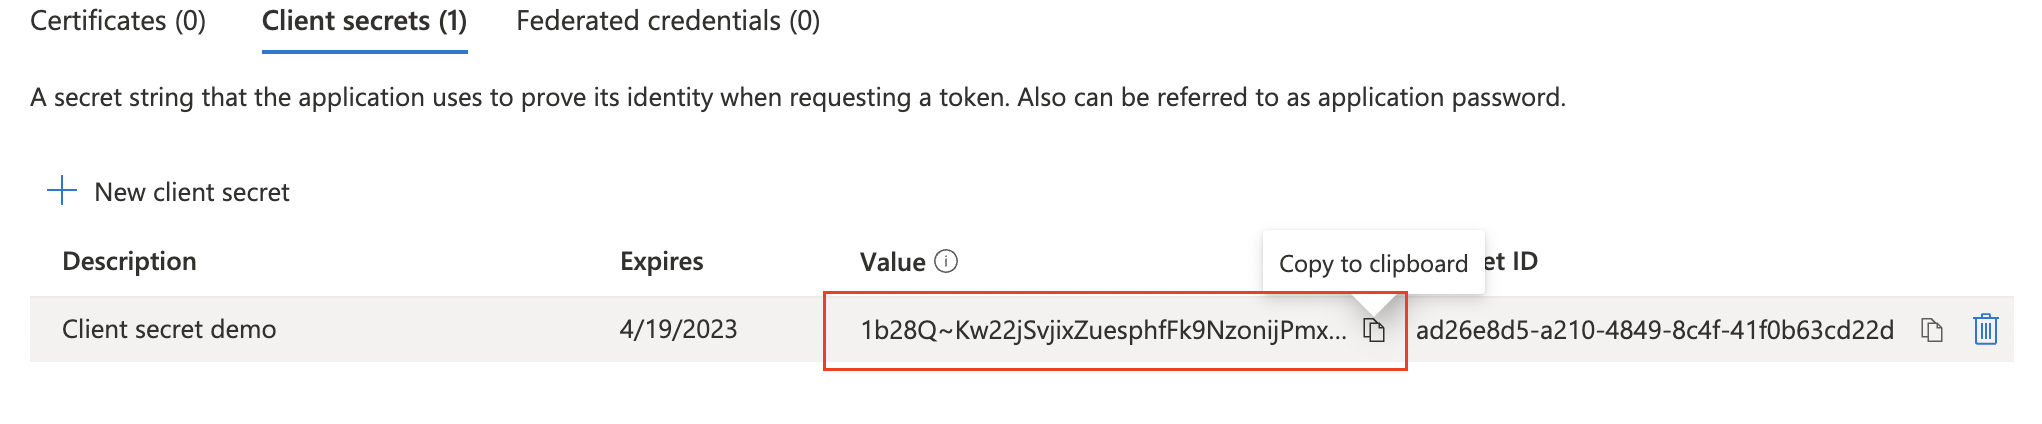
IMPORTANT: Client secret values cannot be viewed except immediately after creation. Be sure to save the secret when created before leaving the page.